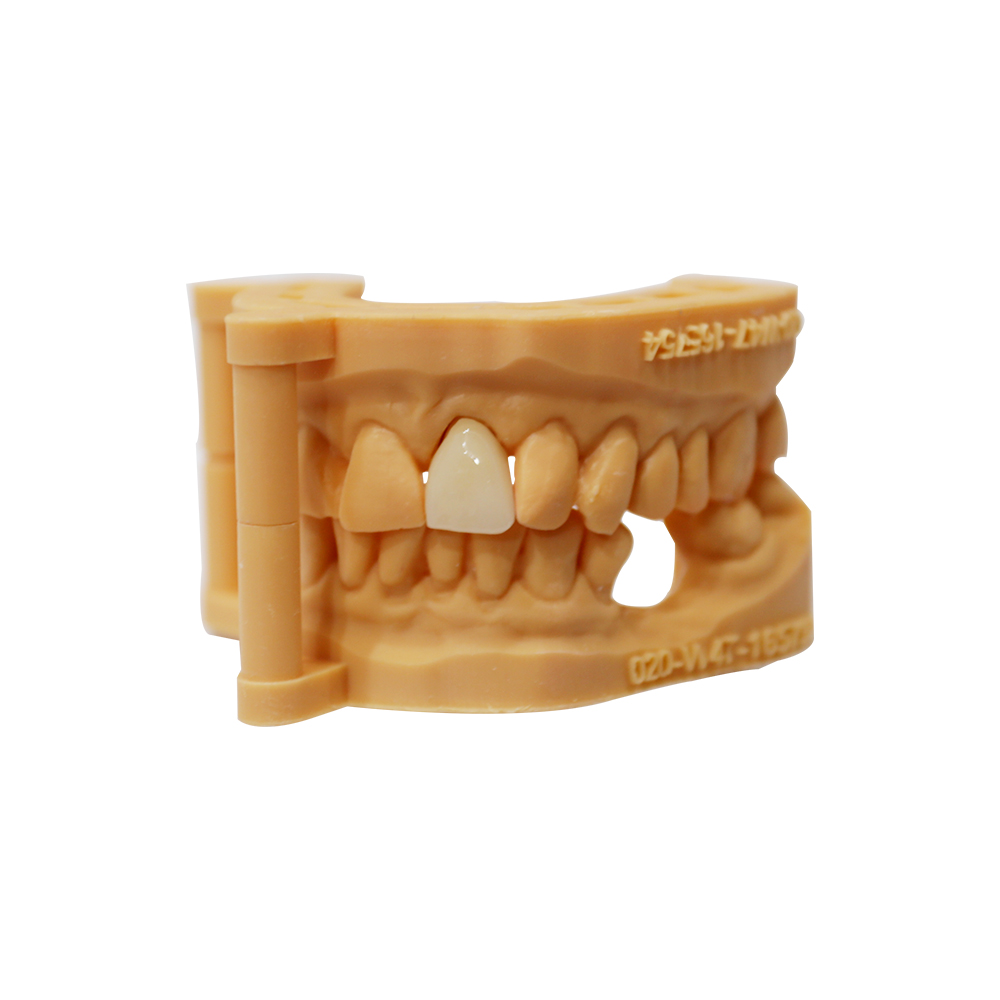
Front Tooth PFM Crown: High Smile Line with Prior Root Canal


Patient Situation
A 34-year-old professional came to the practice with a darkened upper central incisor (tooth #9). The tooth had undergone root canal therapy two years prior, and the internal discoloration was becoming more visible — especially noticeable when smiling or speaking. The patient’s smile line is high, meaning the gum margin shows prominently in photos and daily interactions.
The existing tooth structure was intact, but the dark gray undertone from the treated root canal made the tooth stand out against neighboring natural teeth. Previous attempts with external whitening hadn’t helped, since the discoloration was internal.
What the Dentist Asked For
When the case came to us at ASD Dental Lab, the prescription was clear but challenging:
Material requirement: Anterior PFM crown — porcelain fused to metal, not all-ceramic or zirconia
Why PFM for this case? The dentist explained that while zirconia and e.max are popular for front teeth today, this patient grinds at night (confirmed bruxism) and had a history of chipping a porcelain veneer on the adjacent tooth. The metal substructure in a PFM crown offers better fracture resistance for patients with parafunction, and the practice was more comfortable with PFM’s long-term track record for this type of loading.
The core technical asks:
- Mask the dark substrate — the prepared tooth stump was visibly gray. Standard translucent porcelain wouldn’t cover it.
- Blend with high smile line — the margin would be visible when the patient smiled. Any metal show-through or abrupt color transition at the gum line would be a problem.
- Match adjacent teeth — the neighboring central incisor and lateral incisors were natural, with subtle surface texture and a warm undertone. The crown needed to disappear into that lineup.
- Supragingival margin finish — placed slightly above the gum tissue to keep the margin cleanable and avoid impinging on the biologic width, while still being aesthetic enough for a high smile line.
- Allow for verification before cementation — the dentist wanted to seat the crown and have the patient approve the shade and contour during the try-in appointment, which meant the restoration had to look right on the first attempt.
How We Met These Requirements
At ASD Dental Lab, every PFM crown goes through the same quality-controlled workflow — but front tooth cases get extra design attention because there’s no room for “close enough.”
Step 1: Coping Design and Opaque Layering
We started with a high-noble gold alloy coping (not base metal). High-noble alloys have better biocompatibility and produce a warmer undertone under the porcelain, which helps when you’re trying to blend with natural teeth. The yellow cast of gold is easier to mask than the gray of non-precious alloys.
The coping was designed with:
- Adequate reduction — 1.2 mm on the facial surface, 1.5–2 mm at the incisal edge
- Butt joint margin on the facial to allow space for an opaque porcelain layer and translucent build-up
- Lingual metal collar kept minimal to preserve the emergence profile
After casting and finishing the coping, we applied multiple layers of opaque porcelain on the facial surface. This is where dark tooth structure gets blocked. Standard opaque wasn’t enough for this case — we used a high-opacity masking layer first, then a transitional opaque-dentin layer to avoid a chalky look in the final result.
Step 2: Porcelain Build-Up and Shade Matching
The challenge with masking dark substrates is that if you use too much opaque, the crown looks flat and lifeless. Natural teeth have depth — you see through the enamel into the dentin layer.
We built up the restoration in stratified layers:
- Dentin porcelain (A3 body shade) — placed where natural dentin would be, with slightly warmer hue near the gingival third
- Enamel porcelain (translucent) — thin layer on the incisal third to mimic the translucency of the adjacent natural tooth
- Surface characterization — subtle mamelon effects at the incisal edge, slight texture on the facial surface to catch light the same way natural enamel does
The shade guide submitted with the case showed A2-A3 for the neighboring teeth, but we also referenced the photos provided. In natural light, the adjacent tooth had a warm undertone with low translucency, so we matched that rather than chasing a “bright white” result that wouldn’t blend.
Step 3: Margin and Gum Line Management
For high smile line cases, the cervical margin is as important as the body shade. We finished the margin with a shoulder-butt design — metal coping stops at the margin, porcelain continues to the finish line.
The margin area received an additional pink-gingival porcelain wash to warm up the transition zone. This prevents the “dark line at the gum” issue that many patients notice with PFM crowns. When the restoration is seated, the margin blends into the gingival tissue color rather than showing as a hard gray line.
The dentist’s prescription specified a supragingival finish (margin placed 0.5 mm above the tissue), which gave us room to create a cleanable, smooth margin that wouldn’t trap plaque or irritate the gum tissue. Supragingival margins are easier for patients to maintain and reduce the risk of gingival inflammation around the crown.
Step 4: Try-In and Verification Path
Because this was a high-visibility anterior case, the dentist requested a try-in appointment before final cementation. That meant the crown had to be close to final form on the first delivery.
Our internal QC checklist for anterior PFM crowns includes:
- Contact point verification — must have firm proximal contact with adjacent teeth (checked on articulated model)
- Emergence profile — smooth transition from margin to height of contour, no bulky cervical third
- Occlusion in centric and excursive — no premature contact, especially in protrusive (front teeth should guide smoothly)
- Shade match under multiple light sources — checked under daylight, operatory light, and indoor fluorescent (because patients will see the crown in all those environments)
The restoration was shipped with a shade verification card and remake policy documentation. If the shade didn’t match at try-in, the dentist could return the crown for adjustment before cementation.
Step 5: Final QC and Shipping
Before the crown left our lab, it went through:
- Fit verification on the working die — must seat fully with no rocking
- Margin integrity check — no voids, overhangs, or rough spots
- Surface finish — smooth, glazed facial surface; polished metal on lingual
- Internal surface prep — sandblasted and clean, ready for cementation
Each case ships with a work authorization copy, alloy certificate (documenting the gold content and composition), and care instructions for the patient.
Final Result
The completed anterior PFM crown successfully masked the dark root canal-treated tooth while blending naturally with the adjacent teeth. The high-noble gold coping provided the strength needed for a patient with bruxism, while the stratified porcelain layering gave the restoration enough depth and translucency to avoid the “fake” look that sometimes happens when you over-opaque a dark substrate.
The supragingival margin stayed cleanable and didn’t show a dark line at the gum tissue. At the six-month follow-up (reported by the referring dentist), the crown had no chipping, the gingival tissue remained healthy, and the patient was satisfied with both the function and appearance.
Why PFM Still Has a Place for Certain Front Tooth Cases
There’s a common belief in the industry that “PFM crowns are outdated” or “never use metal for front teeth anymore.” But that’s not quite accurate. While all-ceramic and zirconia restorations are often the first choice for anterior teeth today — and we make plenty of those — PFM crowns remain a solid option when:
- The patient has heavy occlusal forces (bruxism, clenching) that increase the risk of ceramic fracture
- The substrate is severely discolored and needs maximum masking — metal copings can block dark substrates more reliably than zirconia frameworks
- The dentist and lab have a long-standing workflow with PFM that produces predictable results
- Cost is a deciding factor for the patient, and a well-made PFM can deliver durability at a more accessible price point than some premium all-ceramic systems
What We Can Control
- Material quality — high-noble alloys (documented gold content), brand-name dental porcelains (Ivoclar, Noritake)
- Manufacturing precision — CAD-designed copings, controlled sintering cycles, multi-point QC
- Turnaround time — standard single crowns ship within 7–10 business days; rush available for 3–5 days
- Shade consistency — stratified layering, verification under multiple light sources before shipping
- Margin fit — verified on working die, must seat fully without rocking
How to Work With Us
ASD Dental Lab is a full-service manufacturing facility (not a trading company or middleman). Founded in 2012, we operate production facilities in Shenzhen and Huizhou, China, with a team of approximately 460 dental technicians, designers, and quality control specialists.
We handle the entire workflow in-house — CAD design, milling, porcelain layering, metal casting, and finishing. That means consistent quality control and stable turnaround times, even during peak periods.
For anterior PFM crowns and other cases requiring precise shade matching, we ask for:
- Clear photos (facial view in natural light, close-up of the prep, adjacent teeth for reference)
- Accurate shade guide (preferably taken in natural light, with the tab held next to the adjacent tooth)
- Notes on any specific requests (e.g., “patient prefers slightly whiter,” “keep margin pink,” “minimize incisal translucency”)
If you’re a dental clinic, dentist, or dental laboratory looking for a reliable manufacturing partner, we’re open to discussing case workflows, material options, and turnaround expectations. Factory visits are welcome (Shenzhen and Huizhou locations), and we can arrange video factory inspections for international partners.
Questions about this case or similar anterior restorations? Reach out to discuss material selection, shade matching protocols, or digital workflow integration for your practice.