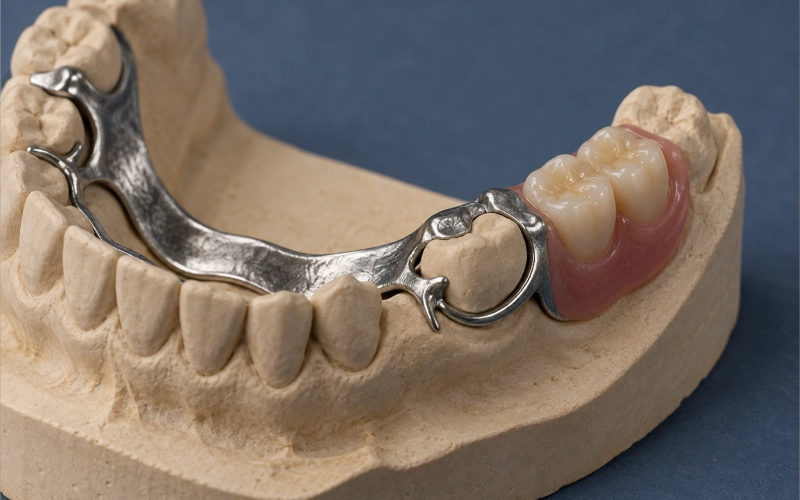
Flexible Partial Dentures for Back Teeth


🕢 [ Udfyld formularen, så svarer vi inden for 30 minutter! ].
What Was Wrong, And Why This Appliance Was Asked For
Patient situation: Male, early 50s. Lower left second premolar and first molar were missing (#18, #19). The gap had been restored with a three-unit bridge years earlier, but one of the abutment teeth developed endodontic failure and was removed six months before this referral.
Implant placement was discussed. The referring clinician ordered a CBCT scan, which showed insufficient bone volume at both sites without grafting. The patient declined the graft-and-implant route — partly the timeline, partly other factors. He wanted function back within eight weeks.
In the meantime, he’d been chewing exclusively on the right side for six months. The opposing maxillary molars had over-erupted by approximately 2 mm, and the distal neighbour (#20, second molar) had drifted mesially, narrowing the edentulous span slightly.
The patient works in a client-facing role. He didn’t want visible metal clasps, and he’d had an allergic reaction to a base-metal partial frame years earlier (confirmed nickel sensitivity on patch testing).
What the referring clinician asked for: A removable appliance for a bounded posterior edentulous space, with flexible retention, minimal visible hardware, and delivery within eight weeks. The prescription specified flexible partial dentures for back teeth — no metal framework, tooth-coloured retentive arms, and a design that wouldn’t show clasps on the canine or first premolar when he speaks.
That request is reasonable. Whether it’s achievable depends entirely on four things, and we test the case against all four before we accept it.
What The Referring Clinician Required Of Us
Eight requirements came with the referral. Each one exists to guard against one of the obstacles above. The right-hand column is what we actually do about it.
| # | Requirement | Guards against | What we do |
| R1 | Keep metal out of any visible area | Patient’s material sensitivity | Clasp and connector positions are annotated on the design drawing before anything is made |
| R2 | Do not ask the flexible base to carry the load on its own | O1 | Rests and connector coverage are placed on the design drawing; occlusion is checked in centric, protrusive and lateral, and premature contacts are removed |
| R3 | Keep base coverage to the minimum retention allows | O3 | The design states the intended extension. Extension and thickness are verified against the signed-off design before packing |
| R4 | The base must not deform — uniform thickness, no thin spots | O2 | Thickness is gauged region by region. Thin areas and sudden changes in thickness are rejected |
| R5 | No internal voids or porosity anywhere in the base | O2 | Resin is mixed to the supplier’s ratio and packed at the dough stage; the cycle steps up gradually through a water bath, cooling is slow, and shock cooling is not used. Bases are then checked under a magnifier with strong backlight |
| R6 | Preserve the occlusion and the vertical dimension exactly as recorded | O1 | Vertical dimension, centric relation and the smile line are recorded at intake; the finished appliance is re-mounted and adjusted |
| R7 | Give the clinician a trial stage before finishing | O2 — there is only one chance to get the form right | A wax or digital try-in is available, with individual tray, wax rim and tooth try-in included where the prescription calls for them |
| R8 | Say now what happens if it needs adjusting later | O2 | See Reline, Repair, And Adding A Tooth Later below — including what has to be sent, and what has to come back to us |
Why We Selected a Flexible Partial Denture for Back Teeth
We had three routes on the table. We rejected two — and the reasons matter more than the pick.
| Route | Verdict | Hvorfor? |
| A. Cast metal framework partial with resin saddles | ❌ Rejected | Best mechanical answer, wrong answer here — it puts metal in the mouth and a clasp in view, which is exactly what R1 rules out |
| B. Acrylic partial with wrought clasps | ❌ Rejected | The base can be kept thin, but the clasps are still metal and still visible at the premolar line. It solves coverage and leaves the original problem untouched |
| C. Injection-moulded flexible partial, bounded design | ✅ Selected | Injection moulding forms the base under pressure, which gives low shrinkage and close adaptation to the cast. With the coverage held to a bounded space, retention stays within what the material can hold |
Why route C is not the same as “just make it flexible”. The material only works if the case is selected for it. Route C was only viable because the gap was bounded, the abutments were sound, and the clinician accepted a trial stage and a bounded extension. Change any one of those and we would have gone back to route A and told the patient why.
Records And Design Sign-Off
We don’t make anything until the records are complete and the design’s been signed off. For a posterior flexible case we need:
| # | Record | Hvorfor? |
| 1 | Accurate model or scan, with the adjacent teeth included | Form is copied from the neighbouring teeth; the cast has to be dimensionally honest |
| 2 | Survey / undercut assessment of the abutments | Retention is designed against the real undercut |
| 3 | Occlusal record | One centric record is standard; long spans may need additional local records |
| 4 | Facebow or semi-adjustable articulator records, where the case involves occlusal change | Keeps the record transferable to the articulator |
| 5 | Shade, mould and tooth arrangement instructions | Specifies what the finished appliance has to look like |
| 6 | The existing appliance, where one is being replaced or copied | Shape, occlusion and vertical height can be carried over |
| 7 | Sketches, photographs of an existing appliance, diagnostic wax-ups or a temporary | Accepted as reference — these are useful, not obligatory |
Design sign-off is a gate, not a formality. Complex framework partials must have the design signed off before production starts. The drawing shows clasp type, rest position, connector dimensions and the extent of the mesh coverage. If the undercuts cannot support the design the clinician asked for, that is where it gets raised — while the case is still a drawing.
Posterior Flexible Partial Denture Fabrication Process
Every step below happens inside our own facilities. Nothing in this sequence is passed to a third-party laboratory.
| Trin | What happens | Control point |
| 1 | Case data received and reviewed against the design | Records complete; design signed off |
| 2 | Model or scan prepared; cast poured and trimmed | Cast checked for accuracy and surface defects |
| 3 | Base formed on the injection-moulded route, formed under pressure | Formed per the signed-off design; coverage matches the drawing |
| 4 | Resin mixed to the supplier’s ratio and packed at the dough stage | Stepped water-bath polymerisation; slow cooling; no shock cooling |
| 5 | Teeth set to the prescription and the shade record | Tooth position, midline, arch curve and overbite verified |
| 6 | Finishing and polishing with the tissue surface protected | Margins and the tissue surface are not cut back; the appliance is returned to the cast to confirm seating |
| 7 | Re-mounted and occlusion adjusted | Centric, protrusive and lateral contacts checked; premature contacts removed |
Where the soft tissue situation’s complex, we use a hybrid route instead — the final base is produced by injection moulding or heat-polymerising on top of the digital record, because milling alone doesn’t reproduce fine soft-tissue margins.
What We Check Before The Case Is Packed
Four inspection stages — model, wax-up, tooth setting, and final processing — each of which can send the case back.
| Check | What we look for | If it fails |
| Occlusion | Centric, protrusive and lateral contacts; premature contacts removed | Adjusted, then re-checked |
| Arrangement | Midline, arch curve, overbite and overjet against the prescription | Reset |
| Base | Extension and thickness compliant; sits without rocking | Reworked |
| Base interior | Voids, cracks and inclusions, checked under magnifier with strong backlight; thick-palate areas and corners are the priority zones | Internal or multiple voids ⇒ remake |
| Clasp | Adapts to the abutment, retentive flexibility is appropriate, does not interfere with the occlusion | Adjusted or remade |
| Færdiggør | Polish is smooth, no scratches or flash; margins and tissue surface unchanged | Re-polished |
| Acceptance basis | Everything measured against the signed-off prescription and design — not against an impression of what it should look like | - |
What The Patient Reported At Try-In
The appliance was delivered to the referring clinic six weeks after the impression was taken. The patient came in the following day.
Immediate seating: The appliance seated without binding. The patient said it felt “lighter than expected” — which is what you want to hear with a flexible partial in the posterior region. No gagging, no obvious pressure points, and the tongue could move without interference.
Occlusion adjustment: The clinician checked centric, protrusive and lateral excursions. Two high spots showed up on the molar cusp in lateral movement — both were adjusted chair-side with a round carbide bur, then polished with a rubber point. The adjustment took under five minutes.
Speech: The patient read a short paragraph aloud. No lisp, no clicking. The “s” and “th” sounds were clear. That’s the advantage of keeping palatal coverage minimal.
Retention check: The clinician tested retention by applying light upward pressure on the occlusal surface. The appliance stayed in place. The patient was asked to open wide, then move the jaw side to side — no dislodgement. Retention was adequate without being excessive.
Two-week follow-up: The patient came back after fourteen days of daily wear. He reported that the appliance felt “natural” after the first three days, and that he could chew on the left side without discomfort. The only adjustment needed was a slight reduction of the buccal flange near the retromolar pad — the patient said it felt “a bit thick” when swallowing. The clinician removed approximately 0.5 mm of material, re-polished the edge, and the issue was resolved.
What the clinician noted: “Tissue response is healthy. No blanching under the saddle, no redness at the clasp contact points. The appliance is stable during function — I watched him chew a piece of bread and there was no visible lift or rotation. The opposing molar hasn’t come down any further, which is good. If the occlusion stays where it is, this should serve him well.”
Follow-Up At Three Months
The patient returned for a scheduled check at the three-month mark. This visit was not because anything went wrong — it was planned from the start to confirm that the appliance was still doing what it was sent out to do.
Function: The patient reported that he was “chewing normally” on the left side. No soreness, no need to avoid certain foods, and no awareness of the appliance during meals. He said he takes it out at night and cleans it with a soft brush and hand soap — no chemical cleaners, which is what we recommend for flexible materials.
Passer: The clinician checked the seating. The appliance still seated fully without rocking or binding. No visible gaps between the base and the tissue. The retention was unchanged from the delivery visit — the appliance stayed in place during function but could be removed by the patient without difficulty.
Tissue health: The clinician examined the soft tissue under the saddle and around the abutment teeth. No inflammation, no blanching, no ulceration. The tissue tone was normal. The gingival margin around the abutment teeth showed no recession — a sign that the clasp load was appropriate.
Opposing dentition: The opposing molar (#15) had not over-erupted any further. The vertical dimension was maintained. The clinician measured the distance from the incisal edge of the lower anterior to the opposing upper anterior — it matched the baseline record.
Abutment stability: The clinician checked the abutment teeth (#17, #20) for mobility. Both were firm. No increased probing depth, no bleeding on probing. The clasp had not loosened or damaged the enamel.
Material condition: The base showed no visible cracks, no loss of polish, and no discoloration. The clasp arms were intact and had not deformed. The patient was advised to continue the current cleaning routine and to return if any soreness, looseness, or breakage occurred.
What the clinician wrote in the notes: “Appliance is functioning as intended. Patient is satisfied. Tissue response remains healthy. No adjustments needed. Will review again at the one-year mark unless the patient reports an issue sooner.”
Reline, Repair, And Adding A Tooth Later
Flexible appliances kan be relined, repaired, and added to. That’s worth saying plainly, because the opposite’s often repeated.
| Situation | What we need from you | How we handle it |
| Reline or rebase | Upper and lower models, the existing appliance, a wax rim | Bonded to the existing base |
| Adding a tooth | Models and the appliance, with the space recorded | Same resin type as the original |
| Repair of a fracture | An impression and an occlusal record before it is shipped | Roughened and cleaned, heat controlled so the existing base is not distorted, then strength-checked |
| Fit or comfort problem after delivery | The appliance and the model it was built on | Reworked or remade |
The honest caveat. It’s not something that gets fixed in the chair. Relining and repairing a flexible appliance means it comes back to the production floor, because it has to be bonded with matching resin and heat-controlled so the rest of the base isn’t distorted. So the answer to “can you do it” is yes; the answer to “can it be done this afternoon” is no.
If the appliance arrives with a factory-side defect, it’s reworked at no charge. That covers an appliance that won’t seat, rocking, an unreasonable clasp set-up, occlusion that’s inaccurate, shade that doesn’t match the prescription, and visible defects on the polished surface.
Holding The Standard As Volume Grows
The fair question about any remote production partner isn’t “was case one good” but “is case fifty the same”. Four things carry that.
| Mechanism | Hvad det er |
| No outsourcing | Every step, from data intake through final inspection, runs inside our own facilities. The workflow does not depend on a supplier’s schedule or a third party’s interpretation of the prescription |
| A design gate | Production cannot start without a signed-off design for complex framework cases. Errors are caught while the case is still a drawing |
| A four-stage inspection | Model, wax-up, tooth setting and final processing. Voids, honeycombing, poor occlusion or poor fit do not get shipped — they go back |
| A stable production base | Removable production runs at roughly 4,000 cases a month in normal periods and up to 6,500 in peak periods, supported by a standing pool of trained back-up technicians. Capacity is planned, not improvised |
The single biggest variable in a remote case is the data that arrives. A clean cast and a complete occlusal record will repeat; a re-seated impression won’t. We’ll tell you which one we received.
FAQs About Flexible Partial Dentures for Back Teeth
Are flexible partial dentures for back teeth suitable at all?
Sometimes — and the deciding factor isn’t the material, it’s the case. They work where the number of missing posterior teeth is limited, the space is bounded by sound teeth at both ends, and the undercuts support the retention that’s being designed. They’re the wrong answer where biting force is heavy, where coverage would have to be extensive, where the undercuts are very deep, or where the saddle’s free-ended.
How many back teeth can one replace?
There’s no number we publish, because the number isn’t the constraint — the geometry is. A bounded two-tooth space on a periodontally stable arch is a different case from the same number of teeth at the end of the arch. Send the cast or scan and we’ll tell you whether the case is inside the indication before you commit.
What do you need to start a posterior case?
An accurate model or scan including the adjacent teeth, a survey or undercut assessment of the abutments, an occlusal record, shade and mould instructions, and a design that we sign off before production. If an existing appliance is being replaced or copied, send it — form, occlusion and vertical height can be carried across from it. Sketches, photographs of the old appliance and diagnostic wax-ups are accepted as reference.
Can it be relined, repaired, or have a tooth added later?
Yes to all three. It has to come back to the production floor rather than being done in the chair, because matching resin and controlled heat are needed so the rest of the base isn’t distorted. Send the models, the existing appliance and a wax rim; if it’s fractured, send an impression and an occlusal record with it.
Will the clasp show?
That’s a design decision, and it’s taken on the drawing before anything is made. Where the clasp sits is fixed by the undercut that’s actually available on the abutment. If the only usable undercut’s on a visible surface, we’ll say so at design stage and discuss the alternatives rather than proceed and let the clinician find out.
What if it doesn’t fit when it arrives?
Send it back with the model it was built on. An appliance that won’t seat, one that rocks, an unreasonable clasp set-up, inaccurate occlusion, a shade that doesn’t match the prescription and visible defects on the finished surface are reworked at no charge.
How long does a case take?
Digital records change the arithmetic — they remove the model-pouring, trimming and physical transport steps, and cut turnaround by roughly one to two days against a conventional workflow. The exact schedule’s confirmed when the case’s booked, because records arriving incomplete move the start date, not the production time.
Send The Case
Send the cast or scan, the occlusal record, the shade and mould instructions, and the design. Complex framework cases are checked against the design before production starts, and you’ll hear from us if a record’s missing rather than find out at delivery.
If you’re weighing flexible partial dentures for back teeth against a framework design, send the case anyway and ask. Telling you that a case’s wrong for this appliance is one conversation. Finding out after a remake’s a rebuild.
Oplev hurtigere ekspeditionstider med vores banebrydende teknologi
Anbefalet