The Real Guide: 5 Key Steps to Getting Dental Crowns Right
Doing a crown feels like a daily routine sometimes doesn’t it? You prep the tooth take a mold and stick the final crown on. It’s a basic part of fixing teeth. But have you ever really thought about what separates a crown that’s just “okay” from one that’s amazing?
That gap between good enough and great is where the real skill is. It’s in the tiny details—that little bit of tooth structure you save the perfectly clean edge or the cement line nobody can see. Getting to this level isn’t about getting lucky it’s about having a solid game plan that you follow every single time. It’s about turning a normal procedure into something special that gives you results you can count on. This is what makes your practice stand out builds patient trust and makes you feel great about your work.
This guide isn’t just another boring checklist. We’re going to dive into the five big steps of doing a crown for dentists who want to be better than just average. We’ll look at the little tricks and smart decisions that turn a standard crown into a work of art.
Table of Contents
Step 1: Careful Tooth Prep and Getting the Edges Right
The final crown can only be as good as the tooth you prepare underneath. A perfect prep is the most important thing for making a crown last. It’s not just about drilling away tooth it’s about building a solid base that will hold the crown in place and keep it from breaking.
How Much to Trim and What Shape to Make
Think of prepping a tooth like you’re a sculptor. You need to remove just enough tooth for the lab to make a crown that’s strong and looks good but you don’t want to remove a speck more than you have to. Saving tooth structure is always the goal.
- Top and Side Reduction: How much you trim depends on the material you pick. A solid zirconia crown might only need 1.0-1.5mm taken off the top but a PFM crown needs more like 1.5-2.0mm to make room for both metal and porcelain. E.max has its own rules too. If you take off too much you weaken the tooth and could hurt the nerve. If you don’t take off enough the lab has to make a weird-looking or bulky crown that will feel high to the patient.
- Taper of the Walls: The sweet spot for the angle of your walls is between 6 and 12 degrees total. It’s a balancing act. If the walls are too straight you’ll have a hard time getting the crown to seat. If they’re too angled the crown won’t have enough grip and could pop off. Picture a lighthouse—its gentle slope makes it stable. That’s what you want for your prep.
- Smooth and Rounded Corners: Sharp inside corners are weak spots. When a patient bites down all the force goes to those sharp points which is a great way to crack a crown especially a porcelain one. You have to round out all the inside corners and make the whole prep smooth. A smooth prep gives you a better impression or scan and a crown that slides on perfectly without getting stuck.
The Margin: Your Make-or-Break Finish Line
The margin is where the crown meets the tooth. It’s a critical spot. A fuzzy or rough margin is just asking for trouble like leaks new cavities and gum problems. These are the top reasons crowns fail.
- Chamfer vs. Shoulder: Your margin design really depends on the crown material.
- Chamfer Margin: This is your go-to for crowns like gold and full zirconia. It’s a gentle curve that saves tooth structure but gives the lab a clear line to follow.
- Shoulder Margin: This is a 90-degree ledge. It gives the most support for materials that need extra thickness like the front of a PFM crown or some all-ceramic crowns. It’s not as conservative but it provides great support for a pretty result.
- Feather-edge: While this design saves the most tooth structure it can be tough for the lab to see clearly. It’s usually only used in special cases like full metal crowns in the back of the mouth.
- Where to Put the Margin: Deciding to put your margin below the gumline at the gumline or above the gumline makes a huge difference for gum health.
- Above the Gums (Supragingival): This is what’s best for the gums. These margins are easy to prep easy to take an impression of and easy for the patient to keep clean. You should put your margins here whenever you can.
- At or Below the Gums (Equigingival/Subgingival): Sometimes you just have to go below the gums. Maybe you need to cover an old filling hide a dark tooth or get more height for the crown to hold on. When you do this you have to be extra careful. If you go too deep and invade the “biological width” you’ll cause constant gum inflammation. This is where managing the gum tissue perfectly is a must.
Core Build-ups and the Amazing Ferrule Effect
But what if you don’t have enough tooth to start with? That’s where core build-ups come in. You use materials like composite to rebuild the tooth into the right shape for a crown.
But the build-up alone isn’t enough especially on a tooth that’s had a root canal. The real secret to preventing a fracture down the road is the ferrule effect. A ferrule is a 360-degree ring of your own natural tooth (you want at least 1.5-2.0mm of it) that the crown wraps around above the edge of your build-up.
Think of it like the metal bands on a wooden barrel. The bands hold the wood planks together. The ferrule does the same thing; it braces the tooth against chewing forces and makes it much less likely to crack. A post helps hold the build-up in but the ferrule is what saves the tooth itself. Without a good ferrule the tooth is much more likely to fail down the road.
Step 2: Nailing the Impression with Molds or Scanners
Your perfectly shaped prep is worthless if you can’t show the lab exactly what it looks like. Whether you’re using old-school impression goop or a fancy digital scanner you have to be precise.
Getting a Clear View of the Gums
You can’t get a good impression of something you can’t see. The number one reason for a bad impression is a blurry margin that’s hidden by gum tissue or blood.
- Packing Cord: This is a basic skill you have to master.
- Single-Cord Technique: Good for healthy gums with a shallow pocket. You just pack one cord to push the tissue out of the way.
- Double-Cord Technique: This is the best way to go in most cases. You place a tiny first cord (like a 000 or 00) deep in the gum pocket to stop any fluid from seeping out. Then you put a bigger second cord (like a 0 or 1) on top to push the tissue away. You pull the top cord out right before you take the impression leaving the first cord in to keep things dry and open.
- Bleeding Control: You have to stop any bleeding. Gels or liquids with aluminum chloride or ferric sulfate work well. Just be careful with them. Ferric sulfate for example can mess with how PVS impression material sets and can stain the tooth so use it wisely.
- Digital Scanners: CAD/CAM has changed the game. Digital impressions are super accurate fast and more comfortable for patients. But the rules are the same. A scanner can’t see through blood or tissue any better than your eyes can. You still need great tissue control to get a clean scan of the margin.
Traditional Molds vs. Digital Scans
- Traditional Impressions (PVS, Polyether): PVS is the go-to material here because it’s stable strong and captures amazing detail. Using a good stiff tray and the right adhesive is key to avoid a distorted mold. When you do it right a PVS impression is still incredibly accurate.
- The Digital Way: Intraoral scanners get rid of a lot of the problems you see with traditional molds—like trays warping material shrinking or bubbles in stone models. The process is faster you get instant feedback on your prep and it’s easier to communicate with the lab. For single crowns studies show that digital scans are just as accurate as traditional molds if not more so.
Getting the Bite Right
A bad bite registration is a recipe for disaster. It leads to a crown that’s too high and needs a ton of grinding in the chair. You have to capture how the patient’s teeth fit together perfectly. Use a good stiff bite registration material and make sure the patient closes all the way down. Telling your lab technician exactly how you want the bite to be is just as important as the registration itself.
Step 3: Making and Using a Good Temporary Crown
The temporary crown is one of the most overlooked steps of the whole process. A good temp isn’t just a placeholder; it’s a tool that helps you get a better final result.
What a Temporary Crown Does
A great temp has several important jobs:
- Protects the Tooth: It covers the freshly cut tooth and stops it from being sensitive.
- Keeps Teeth in Place: It stops the prepped tooth and its neighbors from shifting or drifting up which ensures the final crown will actually fit.
- Keeps Gums Healthy: A well-shaped temp with a smooth sealed edge helps the gums heal in the perfect spot creating a beautiful frame for the final crown. The temp basically trains the gum tissue.
- Acts as a Test Drive: It’s like a blueprint for the final crown. You can check the patient’s speech the look and the bite and make any changes before the final one is made.
Materials and How to Make It
The two main materials for temps are bis-acryl and acrylic resins (like PMMA).
- Bis-acryl: This is what most dentists use today. It comes in a gun is easy to use doesn’t shrink much and doesn’t get very hot when it sets (which is good for the tooth’s nerve). It’s strong and looks great too.
- Acrylic Resins (PMMA): This is the old-school choice. It’s strong and easy to repair but it gets hotter shrinks more and has a stronger smell.
Whether you make the temp right in the mouth or on a model the goal is the same: a temp that fits perfectly.
What a Great Temp Looks Like
- Sealed Edges: The margins must be totally sealed and smooth with no gaps or ledges. This stops junk from getting under it.
- Good Shape and Contacts: The shape should gently support the gums. The contacts between the teeth must be snug (check it with floss) to stop food from getting stuck and keep teeth from moving.
- A Perfect Bite: The temp should have a perfect bite with no high spots. This keeps the patient comfortable and protects the other teeth.
If your temps keep breaking or falling off it’s usually because one of these things is wrong. Taking an extra five minutes to perfect your temp will save you a lot of trouble later.

Step 4: Gluing on the Final Crown the Right Way
This is the moment of truth. All your hard work comes down to this final step which you can’t undo. A perfect cementation job makes sure the edges are sealed the crown stays on and the tooth underneath is safe from new cavities.
Checking and Adjusting the Final Crown
Before you even touch the cement you need to do a careful try-in. Do this before you numb the patient so you can get real feedback on the bite.
- Inside Fit: Use a fit-checker spray or paste to see if there are any high spots inside that are keeping the crown from seating all the way.
- Check the Edges: Use your dental loupes and run a sharp explorer along the whole margin. It should feel totally smooth with no gaps or catches.
- Check the Contacts: The contacts should be just right. Use floss—it should “snap” through but not be crazy tight. If it needs adjusting use a fine diamond bur and then polish it smooth.
- Check the Bite: Use thin articulating paper to find any high spots when the patient bites and grinds. A high spot can cause pain crack the porcelain or even cause TMJ problems.
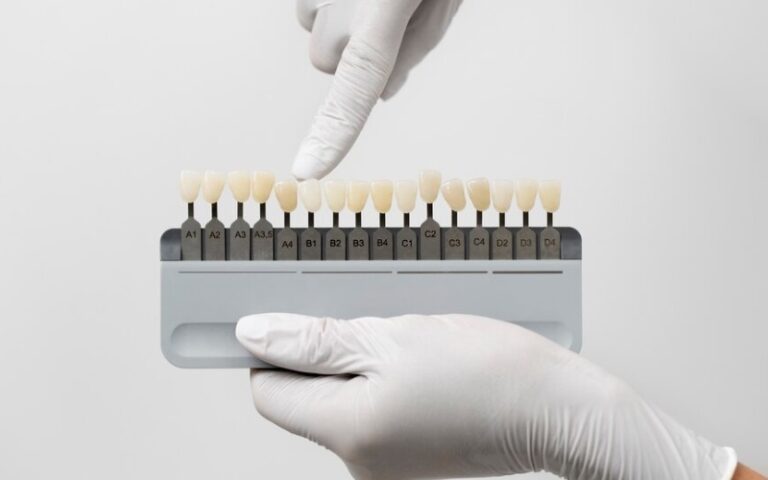
- Color and Look: Finally get the patient’s approval. Give them a mirror and make sure they’re happy with how it looks before you glue it in for good.
Picking the Right Cement
There’s no one-size-fits-all cement. Your choice should depend on the crown material and how well your prep grips the crown.
- Resin Cements: These are the best for bonding all-ceramic crowns like E.max and zirconia.
- Self-Adhesive Resin Cement: This is your go-to choice for preps that have a good grip. They’re simple to use and bond well to both the tooth and zirconia.
- Etch-and-Rinse/Universal Adhesives: For preps that aren’t as grippy or for veneers you need the strongest bond you can get. This means using a multi-step adhesive system.
- Glass Ionomer (GIC) / Resin-Modified Glass Ionomer (RMGI) Cements: These are great choices for PFM and full metal crowns especially on preps with good retention. They’re easy to use release fluoride and are gentle on the tooth’s nerve.
Getting the Surfaces Ready for Bonding
To get a strong bond you have to prep both the tooth and the inside of the crown.
- For E.max: You have to etch the inside of the crown with hydrofluoric acid (HF) and then paint on a silane coupling agent. This creates a super strong physical and chemical lock.
- For Zirconia: You can’t etch zirconia with HF. Instead you need to sandblast the inside and then use a special zirconia primer that contains MDP which chemically bonds to zirconia.
- For the Tooth: Just follow the instructions for whatever bonding system you’re using whether it’s a self-etch or an etch-and-rinse type.
The Cementation Steps: No Room for Error
- Keep it Dry: You have to keep the tooth completely dry. No exceptions. A rubber dam is best. If you can’t use one use cotton rolls Isolite or whatever you need to keep the area free of saliva.
- Seat the Crown: Put a thin even layer of cement inside the crown. Seat it with slow firm pressure letting the extra cement squeeze out.
- Clean-up: This is a huge moment. For resin cements you can do a quick “tack cure” for 1-2 seconds. This turns the cement into a gel so you can easily peel off the extra stuff. Be extra careful here—any cement left under the gums will cause major inflammation. After you clean it all up floss the contacts and do the final cure.
Step 5: Aftercare for a Crown That Lasts
Your work isn’t done when the cement is hard. Making sure the crown lasts for years involves telling the patient what to do and having a plan for follow-up. A perfect crown can still fail if the patient doesn’t clean it right or has a grinding habit.
What to Tell Your Patients Right After
Give your patient clear simple instructions so they know what to expect.
- Sensitivity: Let them know that some temporary sensitivity to cold or biting is normal and should go away. If it gets worse or doesn’t go away it could mean the bite is high and they should call you.
- Cleaning Instructions: This is your chance to be a great teacher. Show them exactly how to brush and floss around their new crown. Make sure they know to clean right at the edge where the crown meets the tooth.
- What to Eat: Tell them to stay away from really hard or sticky foods for the first 24 hours to let the cement get to full strength.
Handling Problems and Making it Last
A crown can easily last 10-15 years or even longer for gold crowns. But that only happens with good maintenance.
- Grinding and Clenching: For patients who grind their teeth a night guard isn’t a suggestion—it’s a must. It protects the new crown and all their other teeth from the heavy forces that can cause fractures.
- Regular Check-ups: Regular cleanings are key for checking the crown’s edges looking for any chips and making sure the gums around it are healthy.
- Be Straight with Patients: The lifespan of their crown depends on three things: the quality of your work the material you used and how well they take care of it (their part).
When you follow these steps you tackle the biggest reasons why crowns fail. You stop new cavities with perfect margins you avoid nerve problems with careful preps and you lower the risk of fracture with the right amount of reduction and a perfect bite.
Conclusion: Taking Your Crown Work from Good to Great
Getting crowns perfect is a journey not a one-time thing. It’s about always trying to master these five key areas: careful prep precision impressions smart temps excellent cementation and great long-term care.
By focusing on these steps you’re not just “fixing” a tooth anymore. You’re creating crowns that are reliable functional beautiful and tough. You build a reputation for doing great work that patients can see and feel. The reward isn’t just a happy patient with a healthy smile; it’s the good feeling you get from knowing you did your absolute best work. That’s what being a true pro is all about.