Valplast Partial Dentures for Upper Back Teeth: Case Study


🕢 [ Füllen Sie das Formular aus und wir werden innerhalb von 30 Minuten antworten!]
Most requests we get for Valplast partial dentures for upper back teeth arrive with the same question tucked in behind the prescription: does a flexible base actually hold up this far back in the mouth? Short answer — it depends on three things. Where the gap sits, how much room the bite leaves you, and what the ridge and the neighboring teeth look like.
So instead of another product page, here’s one de-identified upper posterior case from our bench, start to finish. No names, no guessing. Just what came in, what the dentist asked for, what we did, and what went out the door.
The clinical situation
The patient was referred to the clinic with two upper back teeth missing — both on the same side, both posterior, both gone long enough that the opposing teeth had already drifted. Chewing on that side had gone one-sided for a while. They were tired of it.
The two adjacent teeth were still there, both sound, both responding normally to cold. No mobility, no perio signs worth writing up, no restorations on either side that were failing. The bite was intact. Periodontal charting was within normal limits. There was no history of parafunction — no wear facets on the canines that would point to grinding, no muscle tenderness, no TMJ complaints.
The patient had been through two other routes before this case reached us:
- Implants. Discussed and turned down. The site was suitable on the scan, but the patient didn’t want a surgical phase and the months of waiting that come with it.
- A fixed bridge. The patient wasn’t willing to prep the two sound teeth on either side of the gap to support it. The ADA’s patient guidance is clear on what a conventional bridge costs the neighbours (the American Dental Association). The patient wanted neither of those things done to teeth that were fine as they are.
- A previous metal-based partial. An earlier appliance had visible metal clasps that the patient could see every time they smiled. They were done with metal showing.
What came through on the prescription was short. A bounded edentulous span on the upper arch, two missing posterior teeth, both adjacent teeth sound, no surgical route, no metal showing, esthetics matter. The dentist flagged that the patient had asked about flexible options specifically.
A few numbers we wrote into our work file before doing anything:
- Span: #14 and #15 missing, bounded by #13 and #16.
- Vertical clearance: ~6 mm at the proposed tooth positions on the day-of scan.
- Undercut depth on the abutments: mild and gradual, not the sharp kind that traps a flexible clasp.
- Ridge form at the site: preserved, well-contoured, no obvious resorption.
That’s the shape Valplast partial dentures for upper back teeth work in — neighbours on both sides doing quiet work, the base filling the space, and enough room above the bite for a flexible base and replacement teeth to sit without crowding the occlusion.
Why a flexible base was on the table
Three things came back through the prescription, and they line up with what we build these for:
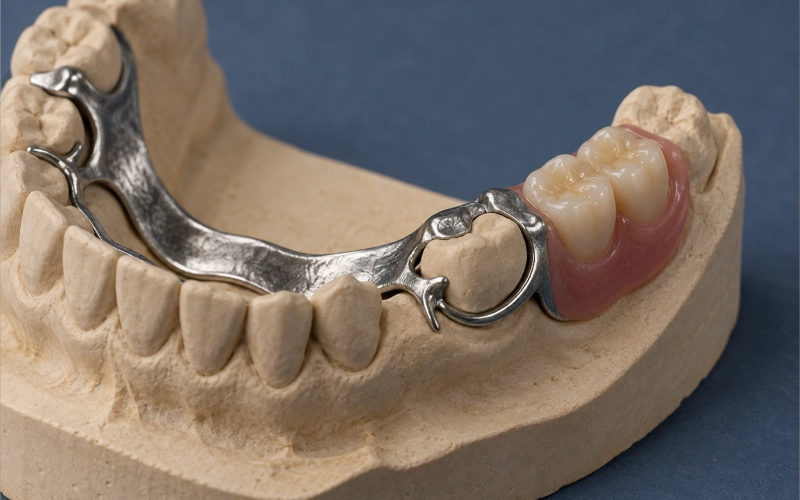
- Nothing gets prepared. A flexible partial sits on the tissue and picks up retention from the natural contours of the teeth. The neighboring teeth stay exactly as they are — no crown prep, no reduction.
- Nothing metal shows. The clasps are made in gingival tones, so there’s no clasp reading across the smile and no metal taste in the mouth.
- It doesn’t close any doors. This is a route that can sit in place while the patient decides what they want long term. Nothing gets ground away in the meantime, so if implants become the plan two years from now, that option is still open.
Upper Posterior Valplast Partial Denture Design Challenges
Four checks had to clear before we’d agree to a flexible base here. This is the part that separates “can you make this” from “yes, and here’s what it depends on”:
- The gap had to be bounded, not open-ended. If the missing teeth had run all the way to the back of the arch with nothing behind them, a flexible base would be doing the wrong job. We check that on the scan before anything else gets discussed.
- There has to be vertical room. Back teeth don’t leave much space, and a flexible base plus the replacement teeth needs a real share of it. Published guidance for this material puts the working figure at around 5 mm of clearance between the arches for retention to do its job (Glidewell Dental’s published guidance on this material). We measure it on the scan rather than eyeball it. If a case comes in under that, you’ll hear it from us before we start — not after.
- The undercuts can’t be extreme. A flexible clasp holds by sitting into the natural undercut of the tooth. Mild and gradual is good. Deep and narrow makes the clasp hard to seat and hard to adjust cleanly.
- The patient has to accept that the ridge changes. This is the bit nobody enjoys talking about. The base can be relined and teeth can be added as the mouth changes (valplast.com — Patients) — but it means sending the case back to us, not a fix in the chair.
That was the last point on the list we raised with the dentist, and it’s the one that came back with conditions attached.
What the dentist asked us to do
Straight off the prescription, in order:
- Scan it. Don’t post an impression if a scan is possible. If an impression is the only route, use VPS or polyether — not alginate, which dehydrates, shrinks and doesn’t survive an international trip.
- Send the working jaw, the opposing cast and a bite record. All three. Not two of three.
- Mark the design up and send it for sign-off first. Clasp type — I-bar or C-clasp — where the rests sit, and how far the base extends. Nothing gets printed or processed until that comes back signed off.
- Nothing that behaves like an open-ended or wide-coverage base. The dentist had seen that go wrong before and wasn’t willing to sign off on it again.
- Gingival-toned clasps only. No exposed metal anywhere the patient can see it.
- Wax try-in before final processing. The dentist wanted to check tooth position and bite while changes were still cheap.
- Ship it with a written care sheet and a written policy for relines and added teeth. Because the patient had already asked what happens when the ridge changes.
- Put the material’s brand, batch and conformity paperwork in with the case. The dentist wanted the paper trail to sit next to the appliance, not in a drawer somewhere.
Nothing on that list needed a phone call. It’s a normal work order for removable cases.
Valplast Partial Denture Fabrication and Quality Control
- Records in, checked the same day. The case gets logged against a single case number, and the records get checked for completeness right away. If the bite record or the opposing cast is missing, we stop and ask. We don’t guess at a bite. Missing records pause production — they don’t quietly reset our clock.
- Design first, then sign-off. The design goes out as a marked-up file, not a verbal description over the phone: clasp type, rest position, base limits. In this case it came back signed off as drawn. When a scan problem or a design revision does come up, it gets photographed and sent, so there’s a dated record of what changed and why.
- Try-in while changes are still cheap. The try-in goes out before final processing so tooth position, midline and bite can be reviewed with time left to move things. Color, surface finish and small contact details stay adjustable after that.
- Processing checks. Base thickness gets measured at the thin spots with calipers. The base gets inspected under strong light for bubbles and voids — anything internal, or anything that shows up more than once, gets remade rather than shipped.
- Polishing without damage. The tissue surface and the margins get protected through finishing. Buffing stays away from the edges, because a polished-away margin turns into a fit problem two weeks later.
- Occlusion before packing. The finished appliance goes back on the articulator against the original bite record, then the bite gets balanced against the opposing arch.
- Then it’s out. Disinfected before it leaves, model packed in an air-cushioned wrap, loose parts bagged and labeled against the case number. You get a notice when design finishes, when production finishes, and when it ships, with a tracking number attached.
Valplast Denture Try-In and Fit Adjustments
Before anything got processed into final, a wax try-in went back to the clinic. That’s where the dentist checks the work while changes are still cheap — and where the patient sees what the appliance is actually going to look and feel like in their mouth, without committing to it.
Seven things we asked the dentist to check at try-in (same checklist we use on every removable case, in this order):
- Ästhetik — tooth shape, smile line, gingival shade of the clasps against the soft tissue.
- Tooth position and midline — running against the patient’s facial midline and the lower incisal display.
- Tooth form — matching the contralateral side in proportion, not a generic mould.
- Occlusion — centric stops, no premature contacts in centric or excursions.
- Vertical dimension — no over-opening, no over-closing, lips relaxed at rest.
- Sprache — the patient reading or counting out loud; “sixty-six” and “Mississippi” tend to surface the trouble spots.
- Base stability and the patient’s overall response — rocking, lifting, gag reflex, the patient’s read on it.
Three things came back from the try-in, all small:
- A small occlusal adjustment on the distal of #14. Centric contact was high by a sliver — adjusted chairside, no need to send back.
- Tooth shade at #15 nudged half a tab lighter. The patient had brought in a reference photo of their own dentition, and the shade tab on the wax try-in read half a step too warm next to it. Changed before processing.
- The patient’s own note on speech. The patient told the dentist the “s” sounds felt a little thick on the right side during counting. Resolved by trimming the acrylic behind the upper anterior teeth by less than a millimetre at processing. Standard for a new upper appliance.
Nothing else moved. The case went into final processing the same day the try-in came back. Sign-off, the adjusted shade, and the patient’s speech note all carried the same case number into the production log.
What actually left the lab
A flexible upper partial replacing the two missing posterior teeth, with gingival-toned clasps and no metal showing. On the model it seats without rocking, the occlusion balances against the opposing arch, and the margins are intact after polishing.
Out of the box with it:
- The appliance itself
- A written care sheet — including the parts people skip
- A written policy for relines and added teeth
- The material’s brand, origin and batch number, with its conformity paperwork
After delivery — what came back from the clinic
The case was delivered, fitted at the clinic, and reviewed at a one-week follow-up. We don’t quote patient satisfaction figures and we don’t claim outcomes — what we can do is record what the dentist sent back.
From the dentist, in writing, on the case file:
- Seating: The appliance seated on first insertion. No rocking on the model and no rocking in the mouth. The two clasp arms engaged the undercuts on #13 and #16 without forcing.
- Retention: Effective on first seating. The dentist noted the patient was able to remove and reseat the appliance without difficulty — which is what a flexible clasp is meant to do.
- Occlusion at delivery: Even centric contacts across #14 and #15, no premature stops. Lateral excursions balanced against the opposing arch. No need for chairside occlusal adjustment beyond what had already been done at try-in.
- Tissue response at one week: No pressure spots reported by the patient. No inflammation at the clasp-tissue interface. The dentist noted the patient had returned for the follow-up without complaint.
- Speech: The “s” thickness the patient had flagged at try-in had cleared. The dentist’s note: patient reported normal speech within the first day of wear.
What the patient told the dentist, recorded by the dentist and passed to us:
- They had forgotten they were wearing the appliance during a one-hour conversation that afternoon.
- They had eaten on the restored side the same evening, on the soft side of the menu at first, then normally within the week.
- They asked, at the follow-up visit, how the reline process works if the ridge changes down the line. The dentist walked them through the written reline policy we put in the box.
- They did not ask for the appliance to be removed or adjusted at any point in the first week.
What that tells us, and what it doesn’t: The clinical checks passed. The patient adapted inside the first week. None of that is a prediction about how the same appliance will perform in a different mouth, on a different ridge, with different home care. We don’t put numbers on it and we don’t put timeframes on it. What travels with the case is the record of what was checked, what was adjusted, and what came back — and that record sits against the same case number as the prescription, the design sign-off, and the try-in notes.
When Valplast Partials Are Unsuitable for Upper Back Teeth
We’d rather say no at intake than rebuild something that was never going to work. Four situations where Valplast partial dentures for upper back teeth are the wrong call:
- Heavy occlusal load. A flexible base flexes under load; that’s what makes it comfortable, and it’s also its limit. If the bite is going to drive a lot of force through the replacement teeth, this isn’t the material.
- Wide-coverage bases. The more tissue the base covers, the more it moves and the harder it is to keep stable.
- Very deep abutment undercuts. Extreme undercuts make a flexible clasp hard to seat and hard to adjust cleanly.
- A gap that runs to the end of the arch. No tooth behind it, nothing to hold onto.
When a case lands in one of those buckets, we’ll tell you at intake and work the alternatives with you — a rigid framework with resin, the same flexible clasps on a different design, or a different base material entirely.
Turnaround, and what happens when something’s wrong
Our production clock runs in working days and starts the day the complete case reaches us — not the day you first emailed. Time spent waiting on sign-offs, missing records or your reply doesn’t count against it. Rush cases are available and we don’t charge extra for them.
If something’s off on our side — a base that won’t seat, a lifted edge, a clasp sitting wrong, a bite that’s high, base color you’re not happy with — it goes back into priority production, and normally turns around in a few days. We’ll ask for a photo and the case number first, because we want the cause before we start filing. If the impression itself was the problem, or the target color or material changed after the fact, that’s a new case rather than a rework.
Questions we get on this case type
- Do the neighbors need any prep?
No. They stay as they are. - Can you add teeth later if the patient loses another one?
Yes — teeth can be added, and the base can be relined as the ridge changes. Both are standing options, not favors. It does mean the case comes back to us. - How long does it last?
There’s no single honest number, so we won’t quote one. Published follow-up on thermoplastic partials mostly covers around twelve months, and the picture gets thinner after that (systematic review, MDPI), which matches what the wider dental literature says about how little has been written on flexible partials outside manufacturer material (PubMed). We look at service life as a case-by-case judgment, and we’d rather tell you that than hand you a number we can’t stand behind. - Which records do you actually prefer?
A scan. If it has to be an impression, VPS or polyether, plus the opposing cast and a bite record. - How should the appliance be looked after?
It comes with a written sheet in the box, and it matters more than people expect — rinse it, use a dedicated denture brush rather than a regular toothbrush, keep it out of toothpaste, and keep it from drying out when it’s not being worn (Caring for your Valplast). It’s in the box so nobody has to memorize it. - Do you make these in other base materials?
Yes. If the case calls for it, we build acrylic partial dentures too, and clasp design is a conversation we’re happy to have before the case is even sent — see dentures with clasps.
Send us a case
If you’re weighing Valplast partial dentures for upper back teeth and you can’t tell yet whether a flexible base is the right call, send the scan and the bite record. We’ll look at the space, the opposing arch and the ridge, tell you what we’d do, and flag anything that argues against it — before you commit to anything.
ASD Dental Lab has been manufacturing in-house since 2012, out of our own facilities in Shenzhen and Huizhou. Design, printing, processing, finishing, quality control and shipping all happen under our own roof, so the person who designs a case isn’t handing it to a stranger halfway through. Cases reach us from the United States and across Europe.
For custom restorations going to the United States, our work is covered by FDA establishment registration and device listing; custom devices for the EU are notified under MDR Annex XIII, and we operate an ISO 13485 quality system. If you want the records behind any case, ask — every case is traceable by its own number, down to the technician, the equipment and the material batch.
Quellen
- mouthhealthy.org
- townelakefamilydentistry.com
- glidewelldental.com
- floradental.co.uk
- mdpi.com
- southkenmd.co.uk
- panamdl.com
Erleben Sie schnellere Durchlaufzeiten mit unserer hochmodernen Technologie
Empfohlen